Rename files
The files on the receiver will all look like this:
FOTF_FOF5_04-09-08_01-01.MP2
The first 4 characters describe the ministry, and the next 4 (after the
underscore) describe the program. Following that is the intended air date of the program (mm-dd-yy).
Following that is the part or segment number and total number of parts or segments,
ie 01-01 (as above) is a one-part file. 01-03 would be part one of a three-part program.
XDS files have a different naming convention, and appear at the bottom of in the renames list.
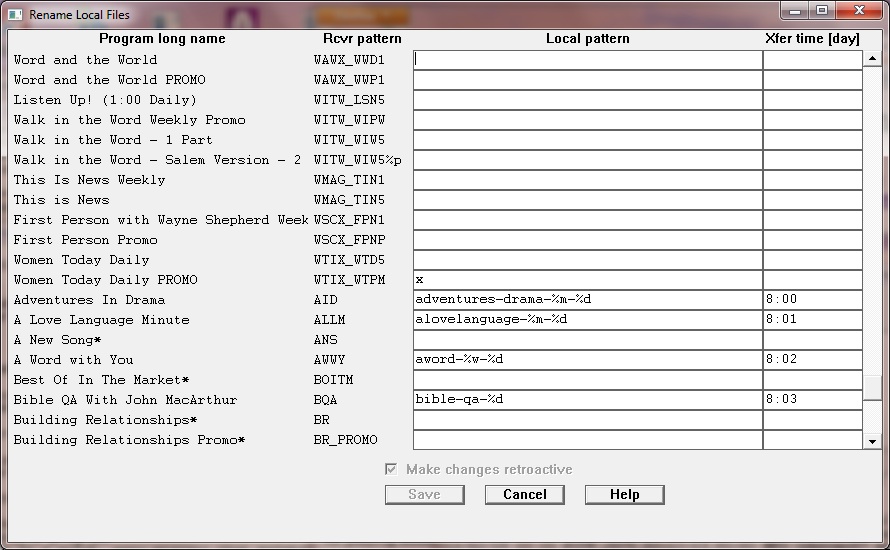
In the rename window, you will see:
Program long name - The formal name of each program so you don't have to look up the secret codes as much.
Rcvr pattern - This is the part of the filename on the receiver that identifies the program. If the file is a multi-part file, you will also see a %p, indicating that you can use the %p or %1 variable in your local name to indicate the number of the part. Not using the %p or %1 variable in a multi-part program will cause all the parts to be combined into one file during the transfer process. (014t and later)
Local pattern - This is what you want the filename to be on your system. Do not use a file extension. this will be determined by the information you enter into the Output format choices in the System Info menu, either mp2 or wav, or another extension of your choosing. If left blank, the original (receiver's) filename will be used. If you enter an x in this field, the files for that program will not be transferred to your computer.
Your local filename can include several variables to be filled in based on the date in the filename on the receiver (letters can be upper or lower case):
Xfer time (day) - The time you would like the file to be transferred, with optional day offset. If this field is blank, the file will be transferred to your local system as soon as it is available on the receiver. If you specify a time, the file will be transferred each day at that time, if the file is available on the receiver at that time. The time should be h:mm (no seconds) using 24-hour time. You may follow the time with a space and a number indicating the number of days before (negative number) or after the air date to actually transfer the file.
If the day offset is followed by a * the monday files for that program will be transfered 48 hours early, ie on friday. That way you can have monday promos transfered early to use on friday.
If no day offset is entered, times between midnight (00:00) and noon (11:59) will be transferred on the same day as the air date. Also, times between noon and midnight (12:00 - 23:59) will be transferred the evening before their air date (an automatic day offset of -1). The idea is that files transfered in the morning will likely be for that day's use, and files transfered after noon are most likely for the next day's use.
The idea behind the transfer times is to over-write the same local file each day. This would be analogous to recording a program from satellite at the same time each day and over-writing the local file with the next day's program. The good news is that you are not bound by the current real-time satellite schedule. You set your own schedule! It is suggested that you schedule the timed transfers somewhat close to your first airing, so that programs produced each evening will have the best opportunity to be on the receiver when your transfer time rolls around.
Above the Save button on the rename page is a choice to Make changes retroactive. If you want your changes to affect files already transferred from the receiver, (ie re-transfer the files already transferred) check this box. The changes will happen at the next Refresh. If you do not check the retroactive box, your choices will be applied to future files arriving on your receiver.
If a file's status is changed by a rename (eg from ignore to misc or timed), the change will be reported in the activity log and window